Warning, extremely old Photoshop tutorials ahead!
These Photoshop tutorials are extremely old, we're talking around 1999 here, so we can't even remember what version of Photoshop
that was. So rather than get rid of them we thought we'd help out the people that still find them useful and celebrate our web design
heritage by keeping them here.
For the keen eyed among you, you can even spot the extremely old HTML from back in the day when web design was a little bit simpler (Mmmm, font tags). No responsive web design here!


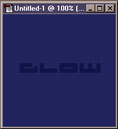 |
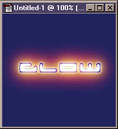
Start with a new RGB image. The size doesn't matter. Fill it with a darkish colour. I used blue. Click on the type tool and in a darker blue type your text. Render the text layer (if you are using PhotoShop 5). | |
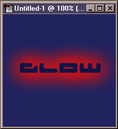 |
Click back on to the background layer and create a new layer CTRL+click on to the text layer to get a marquee. Choose Select > Feather and change it to 15. Don't worry if it tells you nothing with be visible. Press OK Select red as you foreground and hold down alt and press backspace (not DEL) four times |
|
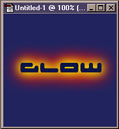 |
Once again create a new layer above the red one and CTRL+Click on the text layer. Change the feather to 8 this time Change the foreground to yellow hold down alt and press backspace three times |
|
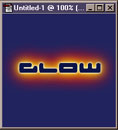 |
And again create a new layer above the yellow one and CTRL+Click on the text layer. Change the feather to 2 this time Change the foreground to white hold down alt and press backspace once |
|
 |
That's it.... If you hide your text layer (click on the eye) the text underneath with glow To get a better effect right click on the text layer and choose layer options From the mode list select Colour Burn. |