Warning, extremely old Photoshop tutorials ahead!
These Photoshop tutorials are extremely old, we're talking around 1999 here, so we can't even remember what version of Photoshop
that was. So rather than get rid of them we thought we'd help out the people that still find them useful and celebrate our web design
heritage by keeping them here.
For the keen eyed among you, you can even spot the extremely old HTML from back in the day when web design was a little bit simpler (Mmmm, font tags). No responsive web design here!


 |
Start with a new RGB image and create a rounded shape
(To see how that is done see the rounded shapes tutorial) and stop when you have created your image in the channel pallet. Make a copy of the image by dragging it on to the new channel icon (the middle one) Select Filter > Blur > Gaussian Blur and set the amount to 6. Remember this because you will need it later on. | |
 |
CTRL+Click on the first channel and the image in the second channel should have a marquee around it Choose Select > Modify > Contract and set the amount to the same amount you used for the Gaussian Blur. In this case 6. The marquee should become smaller. Fill in the area with white. |
|
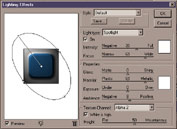 |
Now we use Lighting Effects to give the shape a little depth. Click back on to the Layer Pallet and load the first Channel Select > Load Selection. Fill the marqueed area with you favorite colour Select Filter > Lighting Effects and chose Texture Channel as the second channel. Select the light type as spotlight. I used the following settings:
| |
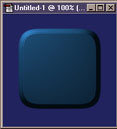 |
By changing the settings in the lighting effects you can get some great results |